In this quick guide, we will show you how to set up conversion tracking for your website. But before we begin let’s understand what exactly conversion tracking is. In simple terms, it’s the data by which you see and measure how effectively your ads click leads to a desired activity such as sales, form submission, email submission, signups, etc.
How can you set up conversion tracking?
You will need to create a conversion action to track your prospect’s actions on your website. For that, you need to set up the same in the Google ads account and get the tracking code. Tracking code is also called ‘tag’. Then you have to add the conversion tracking tag into your website so you can start tracking the conversions.
You need 2 things to successfully implement conversion tracking in your website.
1. Of course a website.
2. Ability to edit the website(Your web developer can also do this for you)
When you have both things ready, it’s time to create a conversion action. To do that follow these steps.

1. First of all, you need to sign in to your Google ads account.
2. After signing in, you will see the tools icon on the top right side corner, go to conversions under measurement.
3. You will see a plus icon with a blue background, click on it and then click on the website.
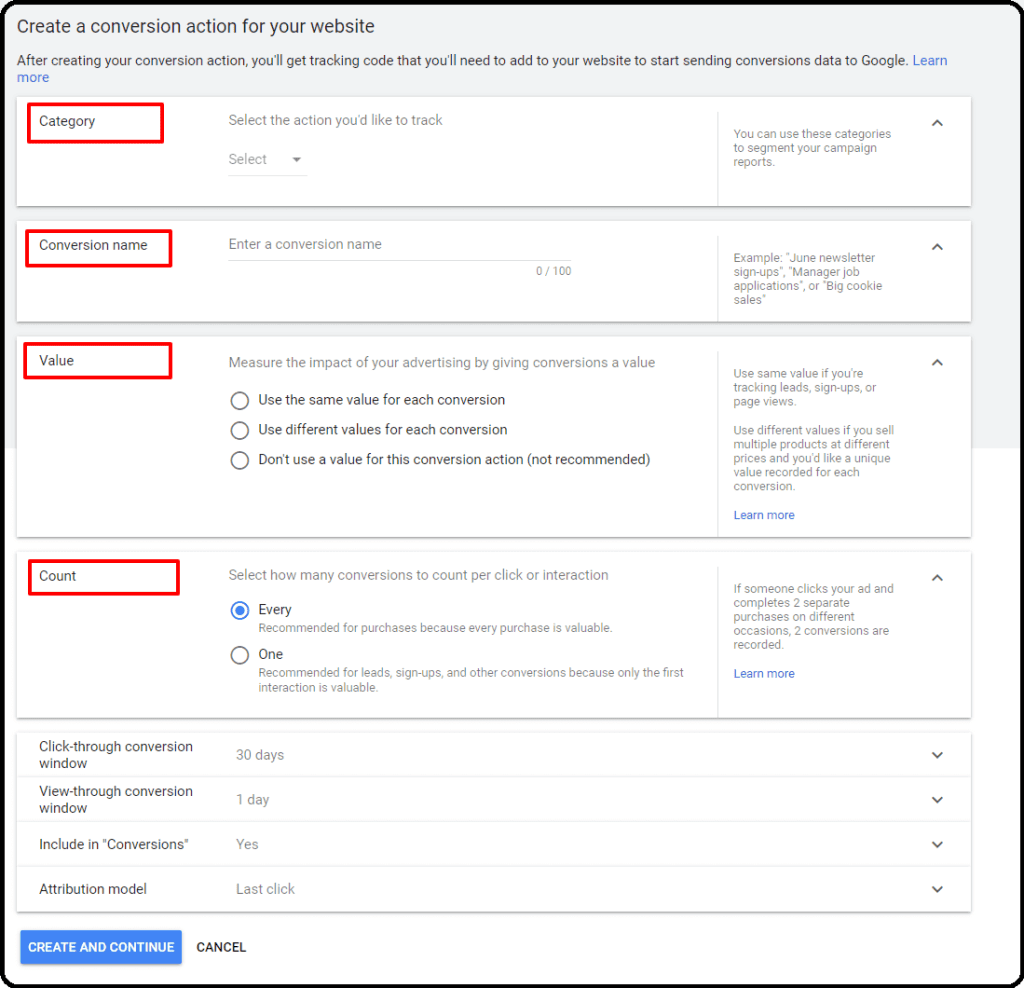
4. You will see multiple actions like sales, leads, or other activities under the category section. Select which action you want to track.
5. Give your conversion action a name so you can recognize those conversions while checking your reports at later stages.
6. You can also add a description next to the category that allows you to segment your conversions in reports, so you can see similar conversions together.
7. Next to value you can also track the value of conversions. You can also opt-out of it if you do not wish to track the value of conversions by selecting don’t use a value.
8. Next to count there are 2 options by which you want to track the conversions, One and Every, choose accordingly.
9. Click to Click-through conversion window. Select how long to track conversions after an ad interaction from the drop-down. You can select from 1 from 90 days in Shopping, Display, and Search campaigns.
10. When you click on the view-through conversion window you can track how long you want to track view-through conversion, there is a time window of 1-30 days in the drop-down menu.
11. Lastly, click on the include in conversion button(this is automatically on by default), but you can also choose to turn it off if you are using smart bidding or do not want to include this conversion data in your bid strategy.
12. After selecting your desired action, click on continue and you are good to go.
After setting up conversion tracking it’s time to set up the tracking code(tag), we discussed before.
Set up Your Conversion Tracking Tag
To begin monitoring website conversions, you’ll need to add two code snippets to your website: the global site tag and the event snippet.
You need to install a global site tag on every page of your website, but there is only one global site tag needed for your Google ads account.
The event snippet keeps track of activities that can be considered conversions. Install this snippet on the pages of your website where you want to log conversions.
You can manually install the code as well, but we will use google tag manager because it’s easy and the chances of errors are less than doing it all by yourself.
Google Tag Manager
You can easily update tags and codes of your website and web pages with google tags manager and you can also use google tag manager to install the tracking code by following these steps.
1. To create a new tag, click on the new tag button.
2. Under tag configuration, there are many options to choose from like Google ads conversions tag, conversion linker, or others. Choose as per your requirements.
3. Enter conversion ID, Conversion Label, and other values from Google ads Interface.
4. Choose a trigger, where you want to fire your tag. We recommend you choose all the pages unless you want to track a single page or a specific number of pages.
5. Enter the page URL and name your trigger.
6. Click on the Save button.


