Retargeting itself means targeting again a specific audience/user. If anyone sees the ad on Facebook and doesn’t make a purchase or desired action then digital marketers retarget those users who didn’t make the desired action with an affordable discount/deal.
Now the big question arises: is retargeting really works or not?
Yes! Many digital marketers say remarketing really works and increases the conversion rates up to the best percentage.
- The CTR of retargeting ads goes 5-10% higher than the normal ad.
- Up to 50% of website visitors are mostly converted by any offer given through retargeting ads.
Some people are willing to buy the product when they see a Facebook ad for the first time. But in the real world, there are chances that any immediate instance took place while at checkout and eventually they left the purchase process, such as :
- Any urgent call they received.
- A home doorbell rang and they were busy gossiping with the person at the door.
- Your kid was crying and you ran after him/her.
- They feel the shipping cost was more than expected.
- They feel the price should be lesser than demanded.
Today we will discuss How to set up a Facebook retargeting campaign step by step.
A. Install the Facebook Pixel on the website
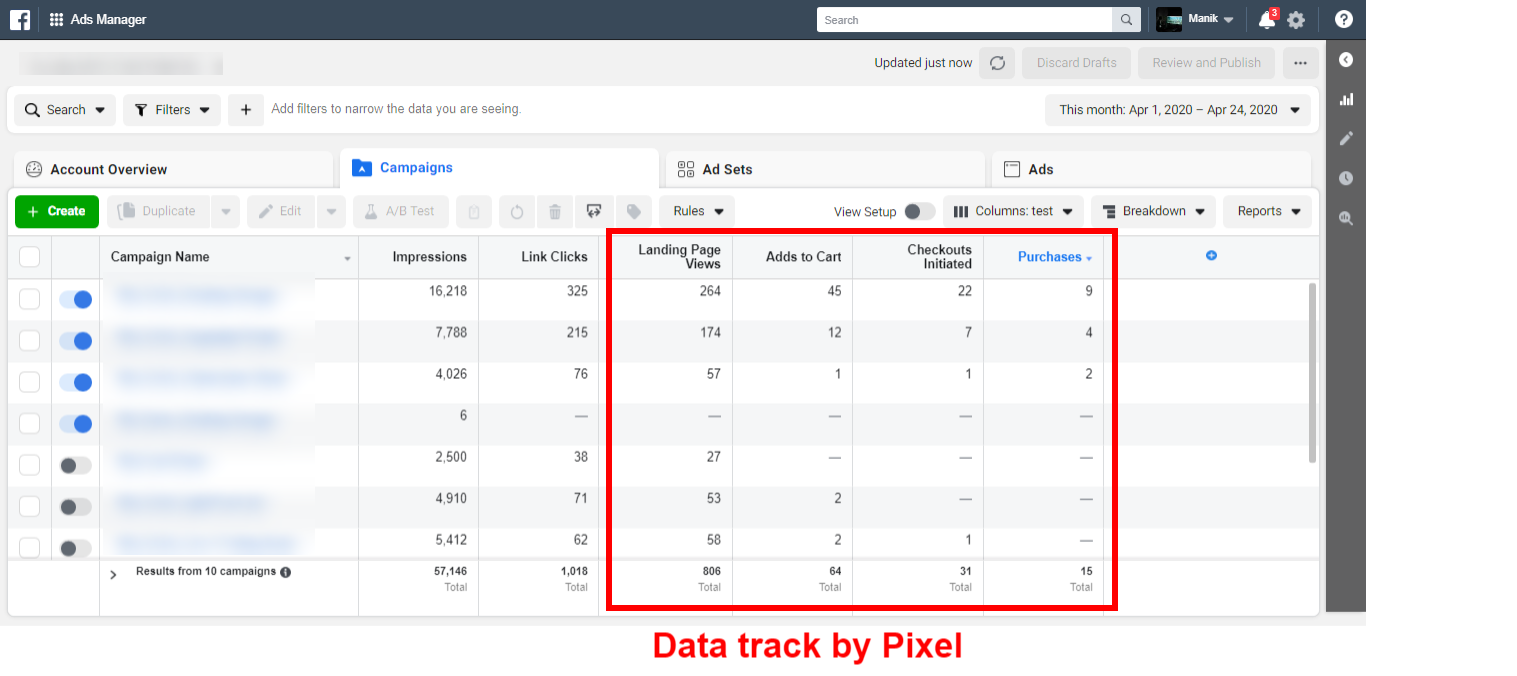
Facebook pixel is the line(s) of the code which has to be installed on the website. This code is used to track the audience’s flow on the website.
If we talk in-depth, pixel gives us the data that states that how many users are visiting the website, how many of them land to the targeted landing page, how many of them are doing ATC(Add to Cart), IC(Initiate checkout) and actual purchase.
Steps to set up the pixel.
1. Click these dots “:::” at the top left of the ad manager.
2. Click on the “Event Manager”.

3. Click on “Add New Data Source” and select the ‘Facebook Pixel’.
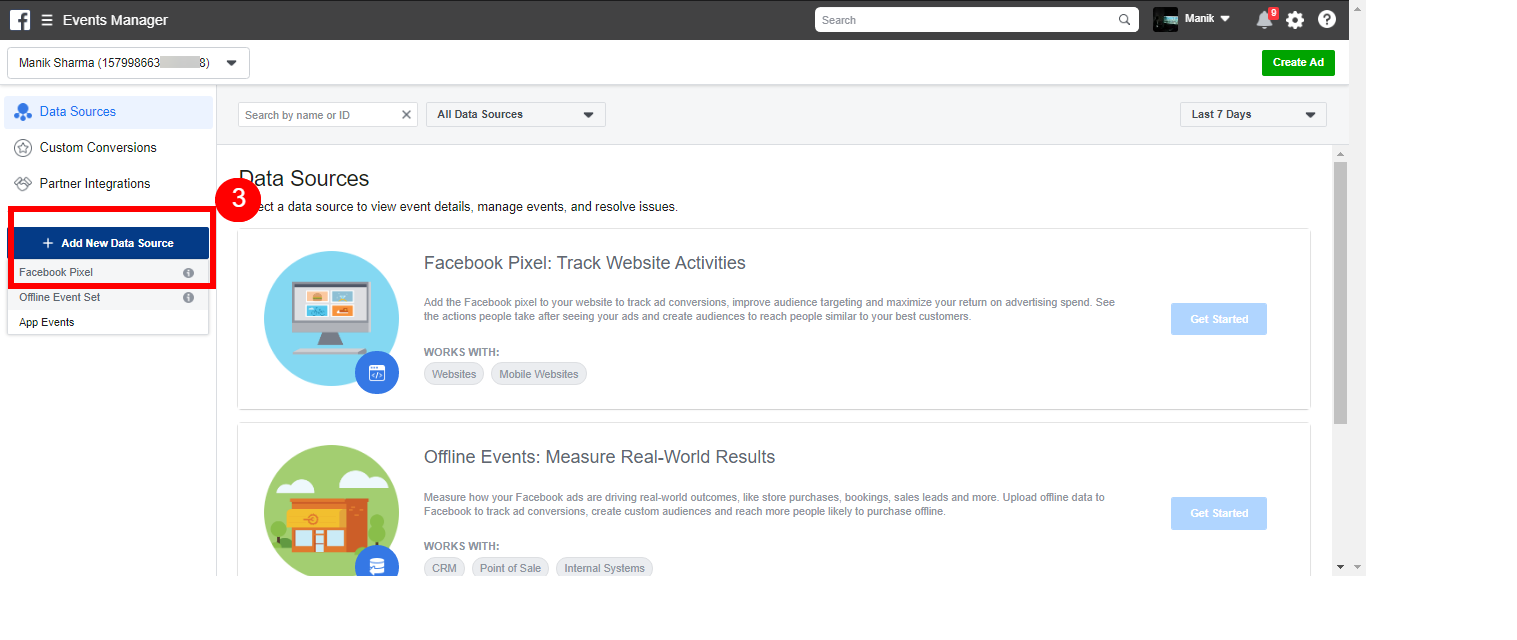
Facebook then shares the code of the line which is the pixel and guides you on how to set up the pixel on the website. Facebook automatically integrates the pixel with BigCommerce, Google Tag Manager, Magento, Segment, Shopify, Wix, and WooCommerce.

You can also copy and paste the pixel code manually in the header(<head>) section of the website.
Let us take the quick sample stats the events track by the pixel:
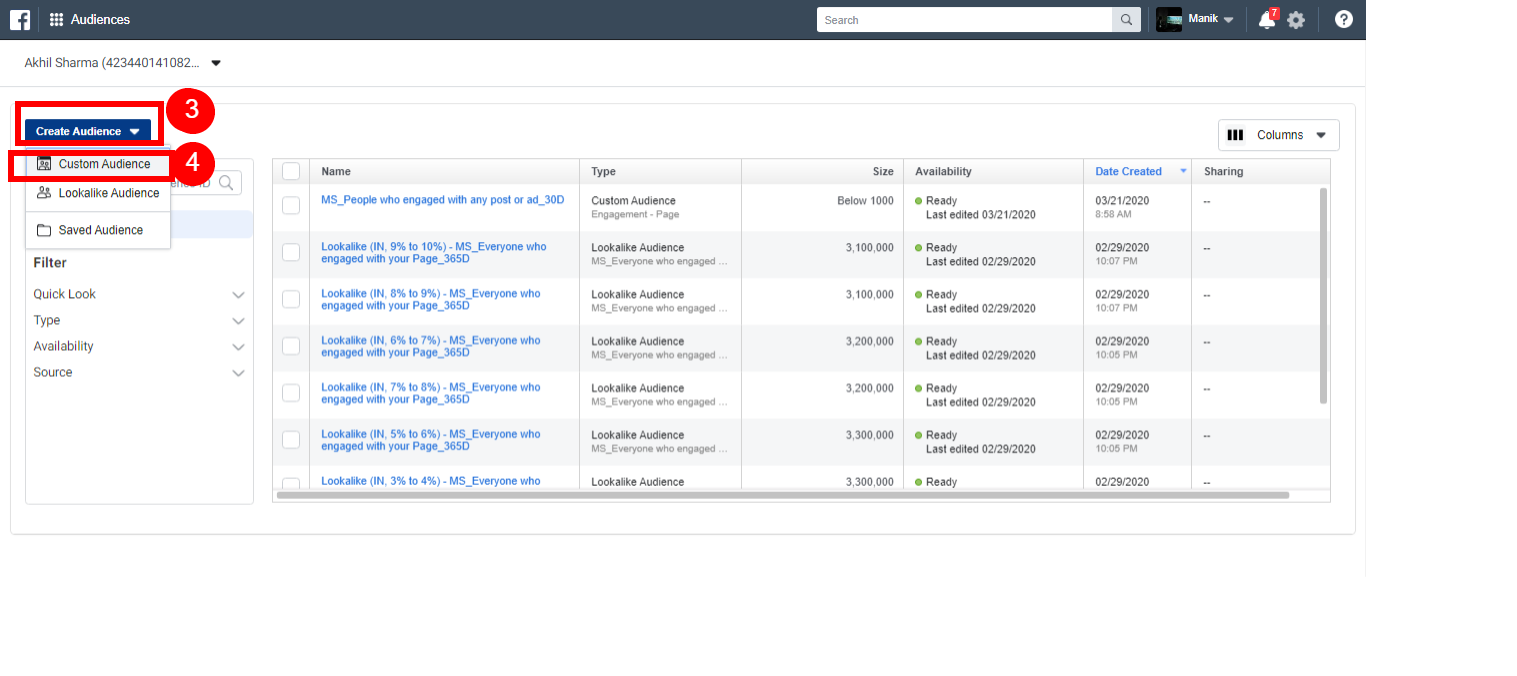
B. Create a Custom Audience(s)
The Facebook pixel helps us to create the custom audience according to the behavior and actions taken by the user.
The following are the steps to create the custom audience.
Create the custom audience by Website
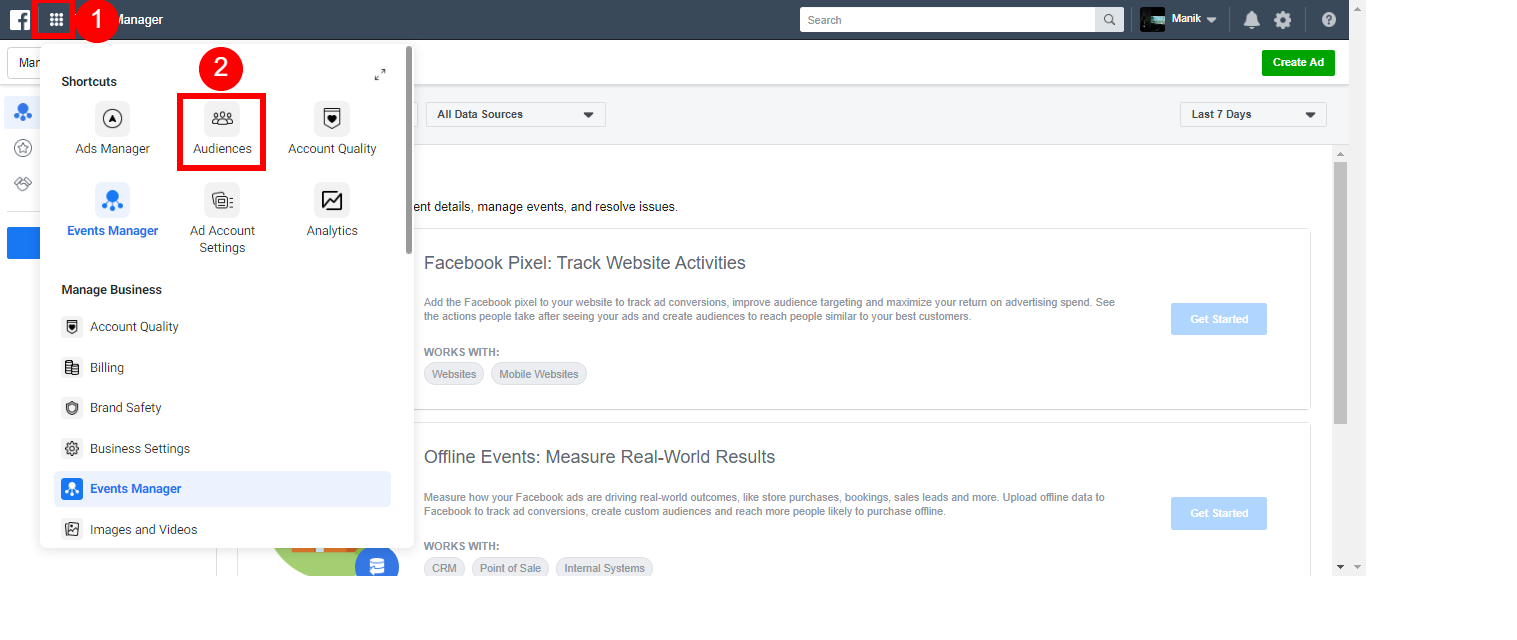
1. Click on the “:::”
2. Click on the “Audiences”
3. Click on “Create Audience”
4. Click on “Custom Audience”
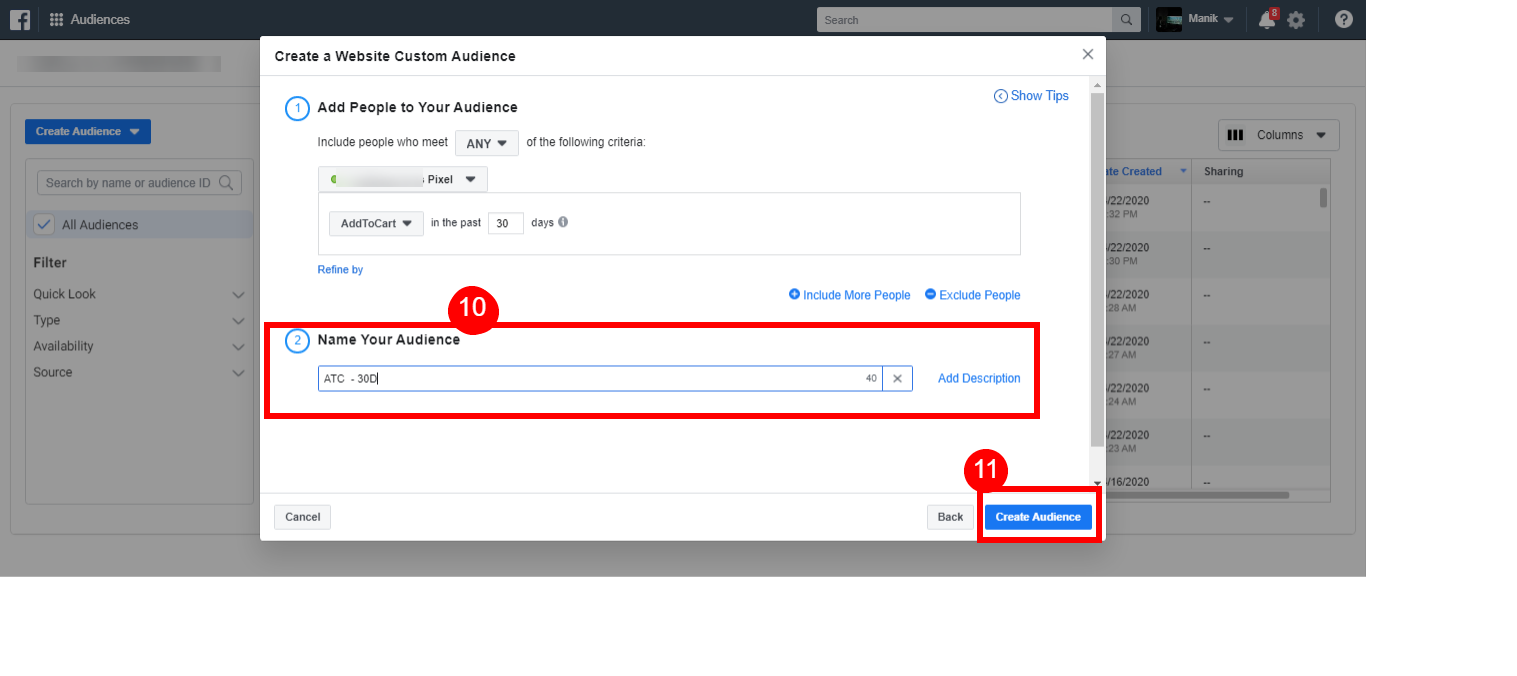
5. Click on “Website” under ‘Use your sources’

6. Select the appropriate pixel
7. Click on the Event’s dropdown pane.
8. Select the event of which you want to create the audience.
9. Enter the number of past days to create the audience.

10. Give the proper name to the audience.
11. Finally, click on ‘Create Audience’.
You can also make the customer audience by uploading the list of old existing customers for upselling.
1. Click on the “:::”
2. Click on the “Audiences”
3. Click on “Create Audience”
4. Click on “Custom Audience”
5. Click on ‘Customer List’ under ‘Use your sources’.

6. Here you upload the CSV file with Name, Email, Phone numbers.
Facebook will find these details on the Facebook profile database and display the retargeting ad(s) to them.

C. Setup the Retargeting campaign
Now at this step, you are actually able to set up the retargeting campaign.
Campaign Level
1. Click on the “+Create” button to initiate the process.

2. Select the campaign objective.
It is a very important step to select the appropriate objective of the campaign because the Facebook algorithm works accordingly.
Suppose if you select the “Video Watch” as the objective then Facebook shows the ad to people who mostly like to watch the videos and if you select the “Conversion” as the objective then Facebook displays your ad(s) to those people who are more likely to do the conversion.

3. Give the proper naming to the campaign
Make a rule while doing the digital marketing ads that always give the appropriate names to the campaigns and ads. It will ease us to read, judge, and determine what is inside this campaign(s) and ad(s).
4. Enter the daily budget
5. Click on “Continue” for proceeding to the ad set level.

Ad Set Level
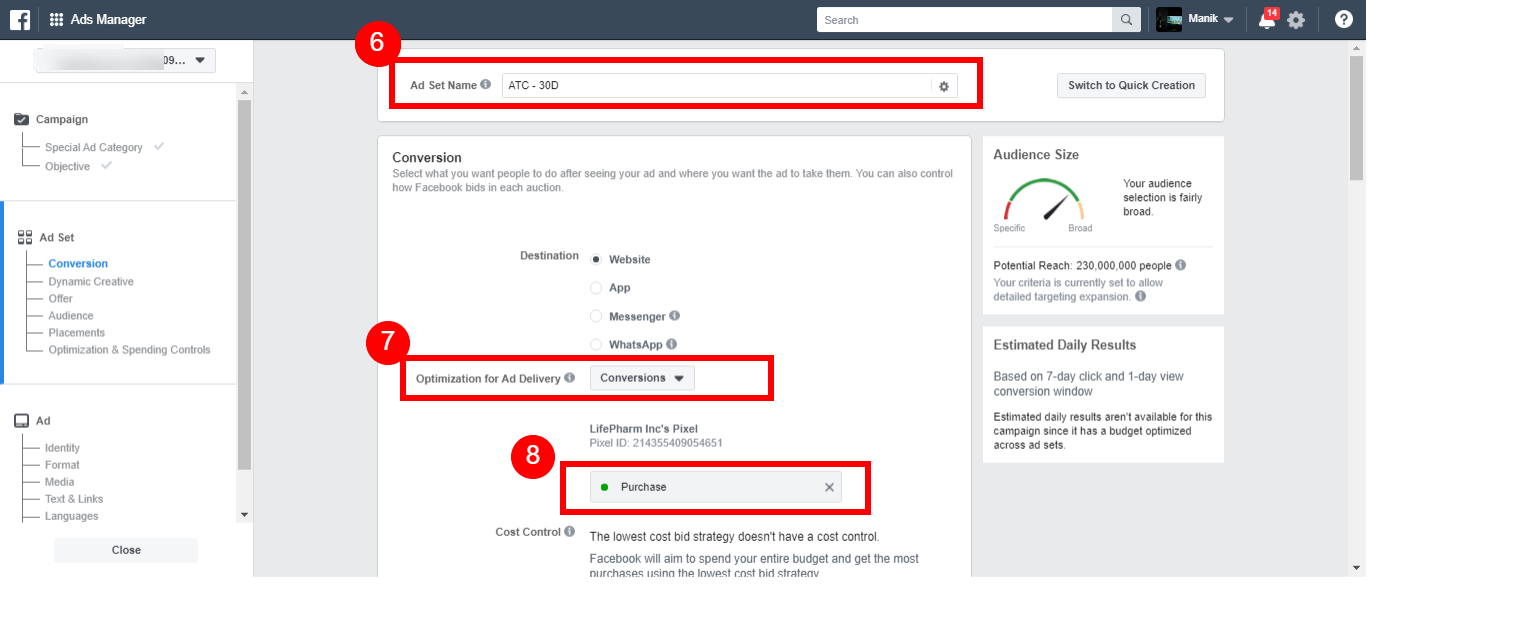
6. Enter the appropriate name of the Ad Set.
7. Select the optimization delivery of the ad.
8. Select the conversion event
9. Enter the custom audience to who you want to target.
Here I’m targeting the people who did ATC(Add to Cart) in the past 30 days and excluding the people as well who already made the purchase in the past 30 days.
The reason for excluding the people ‘who did purchase in the past 30 days is that they have already purchased the item, why should we burn money to show them the retargeting ad.
By this, our audience gets refined.

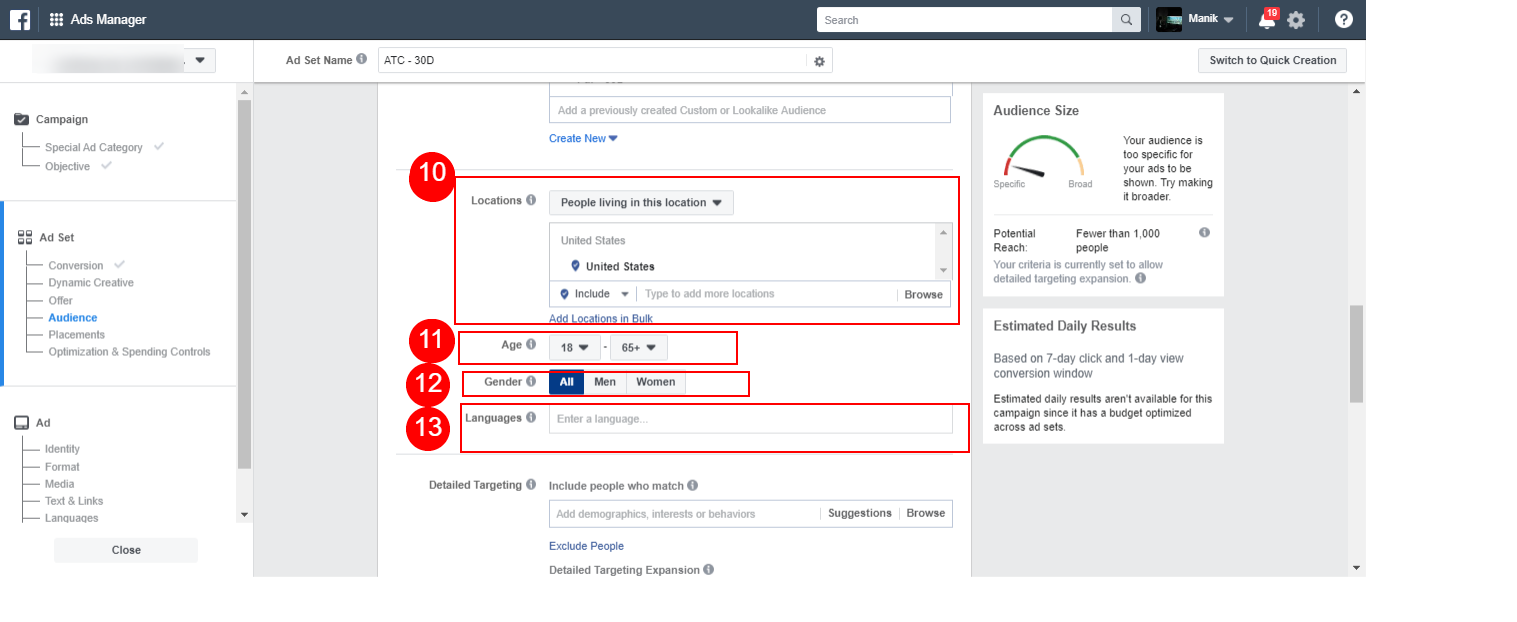
10. Enter the location(s)
You can enter the location(s) by zip codes, city names, states, and countries. You can also add multiple locations. Further, you can refine the location by:
- People living in or recently in this location
- People living in this location
- People recently in this location
- People traveling in this location
11. Select the age bar from 18-65+.
12. Choose Gender.
13. Enter the Language.
14. Select the Placement of the ad.
It defines that you have to select the platform where you want to display your ad. Facebook recommends the Automatic Placements because the algorithm automatically chooses the platform where the ad will perform the best.
But you can also choose Manual Placements to show the ad on a specific platform according to your choice.
15. Set the Schedule of the ad.
You can either enter the Start Date and End Date of the ad or choose ‘Run my ad set continuously starting today’.
16. Click “Continue” to proceed to make an ad.

Ad Level
17. Give the appropriate name to the ad
18. Select the Facebook page that determines your business
19. Select the Instagram page of your business

20. Choose the format of the creative either image, video, or carousel.

21. Select the media as per your choice by clicking on either image or video
You can also create the slideshow by collecting the images.
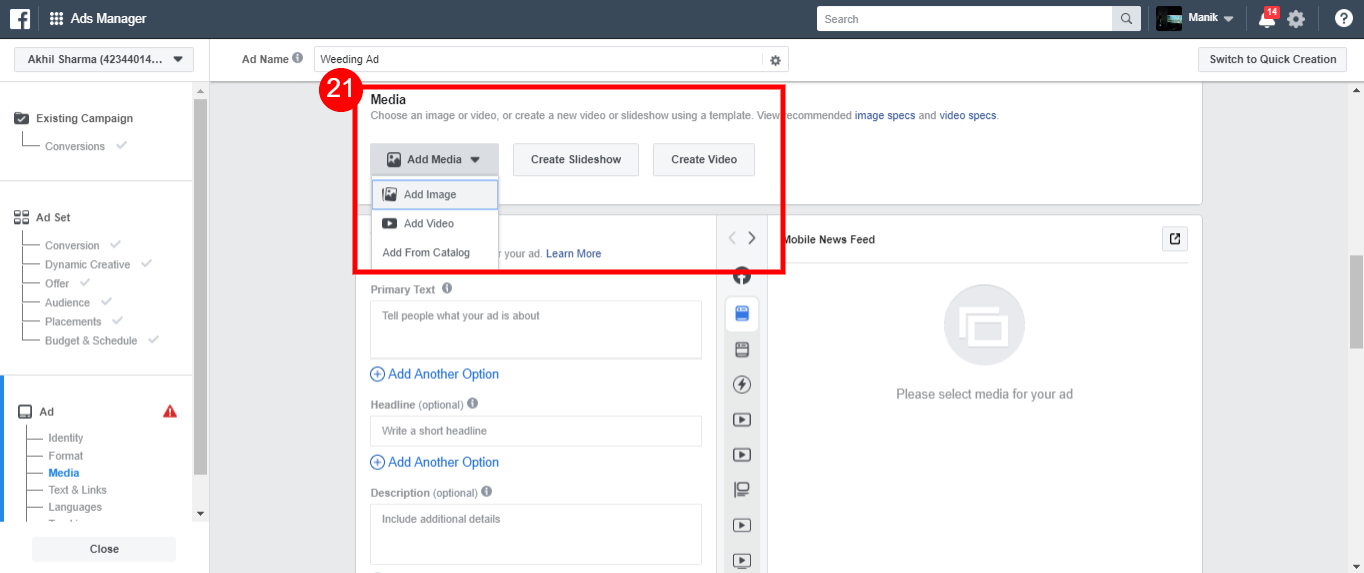
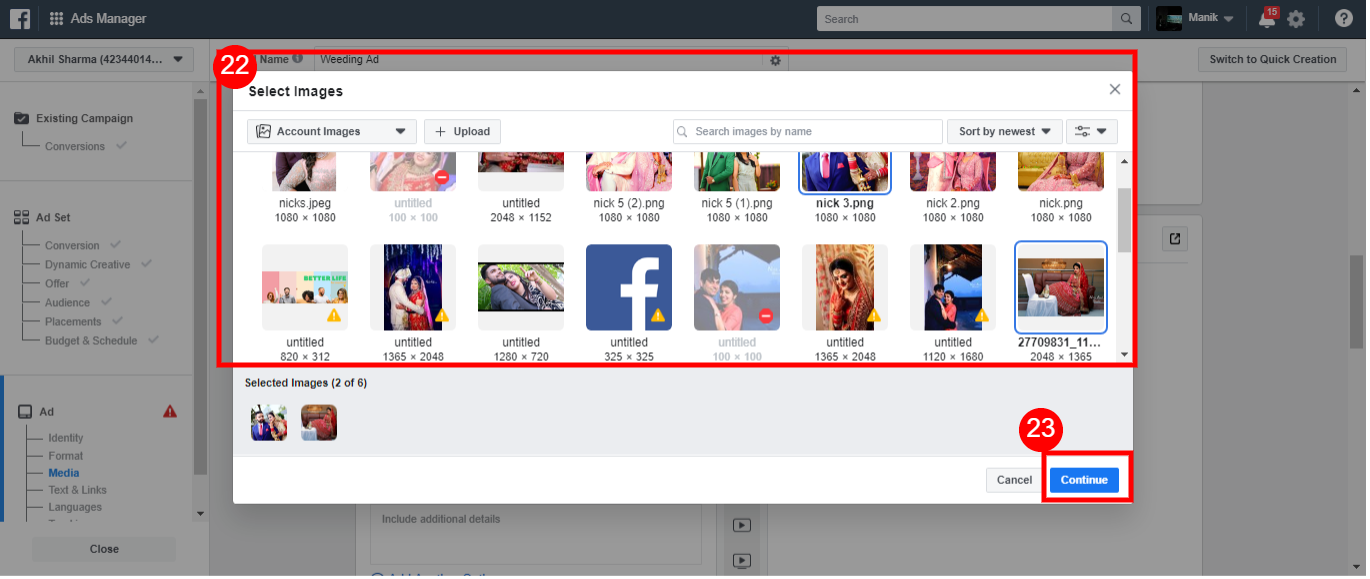
22. Choose the images from an image pane.
23. Click ‘Continue’.
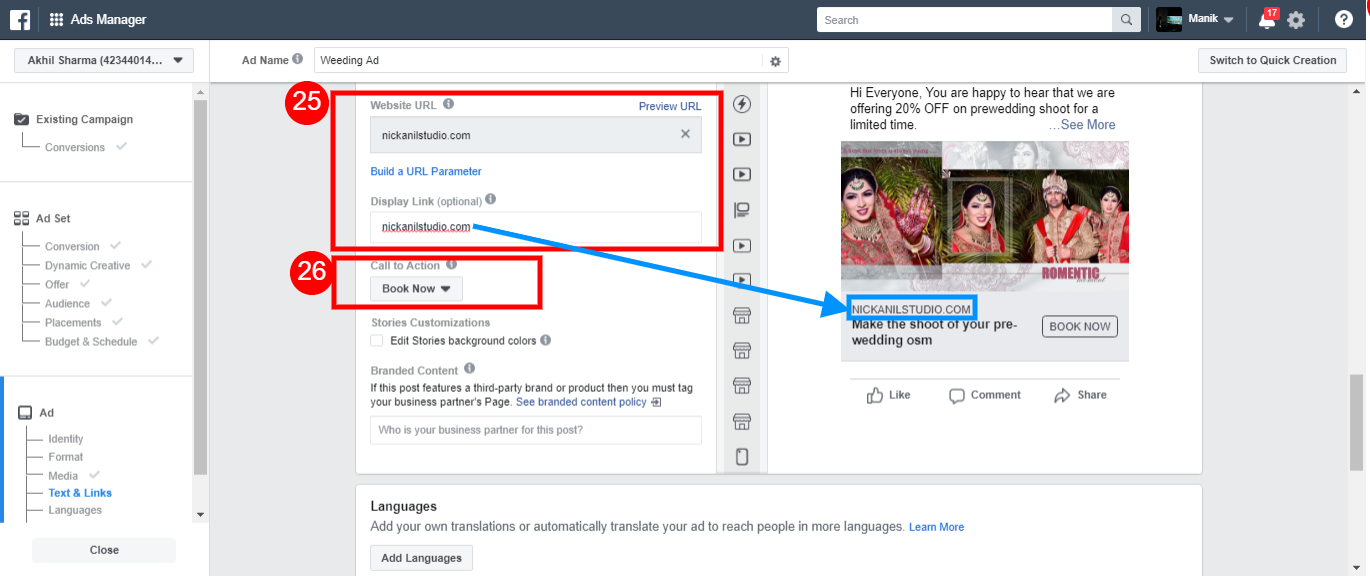
24. Write an exclusive and convincing ad copy that attracts the user/customer. As we are making the retargeting ad you must give the affordable offer to the audience so that they can attract offers too.
In this ad copy, I’m giving the offer to the audience that 20% OFF on pre-wedding shoot plus ten couple images FREE in big size. By this kind of copy, converting chances become high.
25. Enter the URL of the landing page of your website by where you want to land the user when they click on the ad.
26. Enter the display link which you want to display on the ad.
It is optional to display. You may skip this.
27. Click on “Create”.
Your retargeting ad is now created.
Conclusion:
This is a step by step guide to set up the retargeting campaign. Start your retargeting campaign today to convert the user into a customer who left the cart without making the purchase. Plan your remarketing strategy, make the custom audiences, create creatives that attract the user with exclusive offers, and launch the campaign.
Retargeting is all about making the ‘custom audience’ and target with an affordable offer it can be a FREE PDF on a digital marketing course, 10% OFF on first purchase, 50% cash-back by referring to a friend, etc.
Make sure to do A/B testing to find the winning ad and scale it further.


")