
Creating and submitting a sitemap is one of the best ways to ensure that search engines find all of your site’s valuable content. A sitemap isn’t the only way for search engines to find pages on your site, but it is your “direct line” to Google about what’s important.
What is a Sitemap?
Google describes a sitemap as:
“..a file where you provide information about the pages, videos, and other files on your site, and the relationships between them. Search engines like Google read this file to more intelligently crawl your site.”
Sitemaps can be created in various formats, including XML (Extensible Markup Language), RSS (Really Simple Syndication), and Text. The XML format is the most widely used and will focus on the rest of this blog.
Do You Need a Sitemap?
The short answer is that it does not depend on the size of your site or how it is built. If you have a small site (100 URLs) linked internally, you probably don’t need a sitemap. However, having a sitemap will be extremely beneficial if you have a large site with thousands, if not millions/billions, of URLs.
What Does an XML Sitemap Look Like?
XML sitemaps are made for search engines, not humans. They can look a bit daunting if you’ve never seen one before.
<?xml version=”1.0″ encoding=”UTF-8″?>
<urlset xmlns=”http://www.sitemaps.org/schemas/sitemap/0.9″>
<url>
<loc>https://roiminds.com/</loc>
<lastmod>2019-08-21T16:12:20+03:00</lastmod>
</url>
<url>
<loc>https://roiminds.com.com/blog/</loc>
<lastmod>2019-07-31T07:56:12+03:00</lastmod>
</url>
</urlset>
Let’s break this down.
XML Declaration
<?xml version=”1.0″ encoding=”UTF-8″?>
This informs search engines that they are currently reading an XML file. It also specifies the XML version and character encoding. The sitemap version should be 1.0, and the encoding should be UTF8.
URL Set
<urlset xmlns=”http://www.sitemaps.org/schemas/sitemap/0.9″>
This is a container for all of the sitemap’s URLs, and it also informs crawlers about the protocol standard in use. Most sitemaps adhere to the Sitemap 0.90 standard, supported by Google, Yahoo!, and Microsoft.
URL
<url>
<loc>https://roiminds.com/</loc>
<lastmod>2019-08-21T16:12:20+03:00</lastmod>
</url>
This is the URL’s parent tag. The URL’s location must be specified in a nested loc> tag. It is critical that these are absolute, not relative, canonical URLs.
Although this is the only mandatory tag, in this case, there are a few optional properties:
- lastmod>: Indicates when the file was last modified. The W3C Datetime format must be used. If you updated a post on September 25th, 2019, the attribute would be 2019-09-25. You can include the time as well, but this is optional.
- <priority>: Specifies the URL’s priority in relation to all other URLs on the site. The values range from 0.0 to 1.0. Higher is preferable.
changefreq>: Indicates how frequently the page is likely to be updated. Its purpose is to inform search engines how frequently they should crawl the URL. Always, hourly, daily, weekly, monthly, yearly, and never are all valid values.
None of these optional tags are particularly relevant to SEO.
Google’s Gary Ilyes states that they ignore <lastmod> in most cases because “webmasters are doing a terrible job keeping it accurate.” It’s easy to see why most sitemap generators set this to the current date for all pages rather than the date the file was last modified.
Google says they ignore the <priority> tag because it’s just a “bag of noise.”
For <changefreq>, John Mueller says, “Priority and change frequency doesn’t play that much of a role with Sitemaps anymore.”
Why Do I Need a Sitemap?
Crawling the web is how Google finds new content. They pay attention to internal and external links on a page when crawling it. If a URL is discovered that is not already in their search index, they can parse its contents and index it where appropriate.
However, Google cannot find all content in this manner, and if a web page is not linked to other known pages, it will not be found.
Sitemaps can help with this.
Sitemaps direct Google (and other search engines) to the most important pages on your website, allowing them to crawl and index them.
This is significant because search engines cannot rank your content unless indexed.
How to Create a Sitemap?
Some CMS will generate a sitemap for you, automatically updating as you add or remove pages and posts from your site. If your CMS does not do this, there is usually a plugin that does.
Creating a Sitemap in WordPress
Even though WordPress powers 34.5% of websites, it doesn’t generate a sitemap for you. To create one, you need to use a plugin like Yoast SEO.
To install Yoast SEO, log in to your WordPress dashboard.
Go to Plugins > Add New.
Search for “Yoast SEO.”
Hit “Install now” on the first result, then “Activate.”
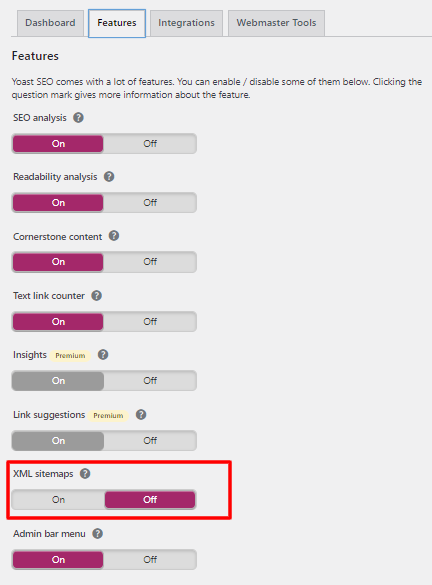
Go to SEO > General > Features. Make sure the “XML sitemaps” toggle is on.
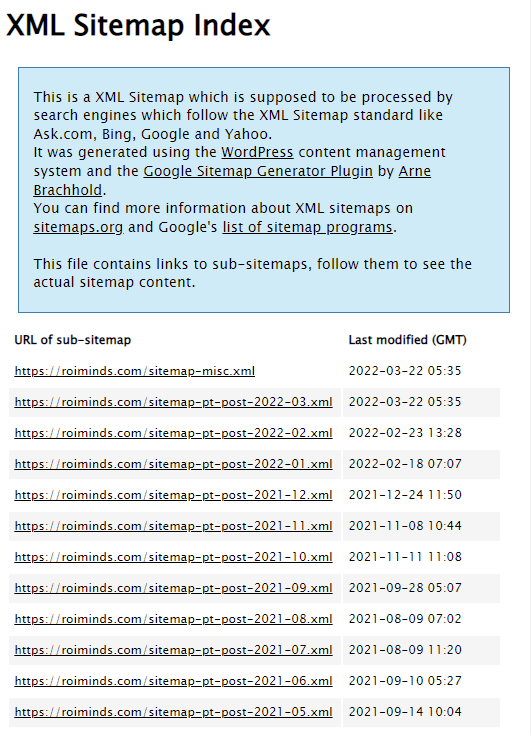
You should now see your sitemap (or sitemap index) at yourdomain.com/sitemap.xml or yourdomain.com/sitemap_index.xml.
Creating a Sitemap in Wix
Wix automatically generates a sitemap for you. This can be found at yourwixsite.com/sitemap.xml.
Unfortunately, you have little control over which pages are and are not included in your sitemap. To exclude a page, go to the “SEO (Google)” settings tab for the page and uncheck the “Show this page in search results” checkbox.
This also adds a no-index meta tag to the page, making it invisible in search results.
Creating a Sitemap in Squarespace
Squarespace will also generate a sitemap for you. It’s usually accessible at yoursquarespacesite.com/sitemap.xml.
Squarespace does not allow you to manually edit your sitemap, but you can exclude (no-index) pages from search engines in the “SEO” tab.
This also removes the page from your sitemap.
Creating a Sitemap in Shopify
Shopify automatically generates a sitemap for you. Find it at yourstore.com/sitemap.xml.
Unfortunately, there’s no easy way to no-index a page in Shopify, and you have to edit the code in the .liquid files directly.
Creating a Sitemap Without a CMS
If you think there are fewer than ~300 pages on your site, install the free version of Screaming Frog.
Once installed, go to Mode > Spider.
Paste your homepage URL in the box labeled “Enter URL to spider.”
Hit “Start.”
Once the crawl is complete, look at the bottom-right corner.
If the number is 499 or below, go to Sitemaps > XML sitemap.
Because Google doesn’t pay much attention to <lastmod>, <changefreq>, and <priority>, we recommend excluding them from the sitemap file.
Hit “Next” and save the sitemap to your computer. Done.
If the number shows “500 of 500,” then there’s no point exporting a sitemap. Why? Because it means you’ve hit the crawl limit before it crawled all the pages on your site. As a result, hundreds of pages could be missing from the exported sitemap, making it rather useless.
One way to solve this is to search for a free sitemap creator. There are lots of them.
Unfortunately, most aren’t reliable.
We tested some of the most popular generators and found that many include non-canonical URLs, no-indexed pages, and redirects. This is bad SEO practice.
Once the crawl is complete, go to the Page Explorer and add these filters.
Hit Export > Current table view.
Open the CSV file, then copy and paste all the URLs from the URL column into this tool.
Hit “Add to queue,” then “Export queue as sitemap.xml.”
This file is your completed sitemap.
How to Submit a Sitemap to Google?
To begin, you must identify the location of your sitemap.
If you’re using a plugin, the URL is probably domain.com/sitemap.xml.
If you’re doing it manually, name your sitemap something like sitemap.xml and save it to your website’s root folder. After that, you should be able to access the sitemap at domain.com/sitemap.xml.
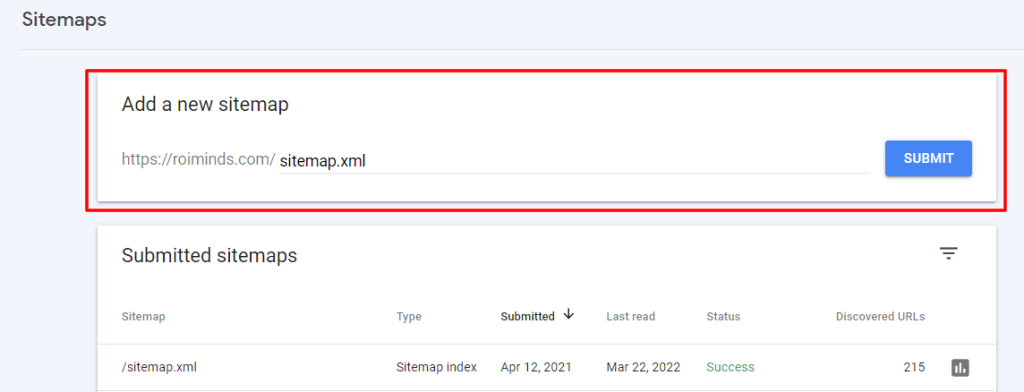
Go to Google Search Console > Sitemaps > paste in sitemap location > click “Submit”
That’s all. Done.
Fixing Common Website Errors That Affect Your Sitemap
Google Search Console reports the majority of technical errors related to your sitemap.
Here’s an example of a warning that one of our submitted URLs has been blocked by robots.txt:
However, there are some issues that Google does not inform you of.
Here are a few of the more common ones and instructions on how to locate and repair them.
Useless, Low-Quality Pages in Your Sitemap
Every page in your sitemap should now be indexable and canonical.
Unfortunately, that doesn’t mean all those pages are of high quality. If you have a lot of content, some low-quality pages likely made it into your sitemap.
Neither is valuable for searchers, yet they’re still in that website’s sitemap, and Google has both pages indexed.
To find these pages, go to Site Audit > Duplicate Content.
Look for clusters of duplicate and near-duplicate pages without canonicals. These are the orange squares. Click one to see all the pages in the group.
Check out the pages and see if they have any value.
Having low-quality pages on your site is bad for three reasons:
- They waste the crawl budget. Making Google waste time and resources crawling useless, low-quality pages isn’t ideal. They could be spending that time crawling more important content instead. (For the record, Google states that crawl budget is “not something most publishers have to worry about.”)
- They “steal” link authority from more important pages. There’s a clear correlation between the authority of pages and their rankings. Internal links to low-quality pages only dilute authority that could flow to more important pages.
- They result in a poor user experience. There’s no value to visitors landing on these pages. It’s annoying for visitors to click on them, and they may end up bouncing if they feel your site is low-quality and neglected.
All in all, the best course of action is to remove low-quality from your website and, subsequently, your sitemap. You should also remember to remove any internal links to those pages if you’re doing this. Fail to do that, and you’ll swap one problem (low-quality pages) for another (broken links).
Beyond duplicates and near-duplicates, you can also look for pages with thin content.
Just check the “On page” report in Site Audit for pages with a “Low word count” warning.
Pages Excluded from Your Sitemap by Accident.
If you used any of the recommended methods above to create your sitemap, pages with no-index or canonical tags (non-self-referencing) wouldn’t be included.
That’s a good thing. You shouldn’t include canonicalized URLs or no-indexed pages in your sitemap.
That said, if you have rogue no-index tags on your site, pages can get excluded by accident.
To check for errors, head to the “Indexability” report in Site Audit and click the “Noindex page” warning. This shows all no-indexed pages.
Most of these will likely be intentionally no-indexed, but it’s worth skimming the list to double-check. Usually, rogue no-index tags are easy to spot as they’ll exist across an entire subsection of your site.
If you see any pages that shouldn’t be no-indexed, remove the rogue no-index tag from the page and add it to your sitemap. If you’re using a CMS or plugin, this should happen automatically.
Final Thoughts
Creating a sitemap isn’t difficult, especially if you use a plugin that handles the heavy lifting. It’s also not difficult to make one from scratch—just crawl your site and format the resulting lists of URLs.
However, keep in mind that Google is not required to index the pages in your sitemap. Sitemaps, on the other hand, have nothing to do with rankings.


